
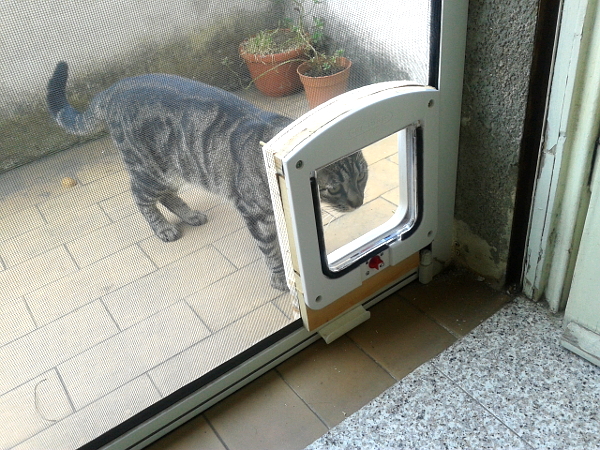
Since hot season began, Clothilde discovered the joys of laying on our balcony, in the shadow of our potted plants. Probably she’s picturing herself taking down, with one swift jump, one of those crows cawing around all the time… even though in the end she contents herself with catching flies and eating cat grass (and fortunately leaving alone my other plants!).
The only issue with it is that, to get to the balcony, she claws the mosquito net, pulls it out of its binaries and jumps out. It’s not ideal if you plan to keep mosquitos out and a long living net.
So we started surfing the internet, but apparently no one ever really tried to build a cat door on a mosquito net (one that rolls up).
The most helpful advice was: cut a U shape in the net, put weights on the lower side so that it stays put when the cat goes through it.
Now… please… simply cutting mosquito net and not only weighting it down but also having a cat go through it??? Well, the mosquito net is short lived like that, I’m sure of it!!!
The only other useful thing was australian, so I really don’t think they sell it here in Italy!
Our last chance was DIY.
The idea behind it is: using a cat door for a regular wooden door and install it on a mosquito net, of course providing a fake “wooden door” around it to be able to screw it in. So here’s how we built the fake wooden door around the cat door.
Yes, we did it!!!
What you’ll need:
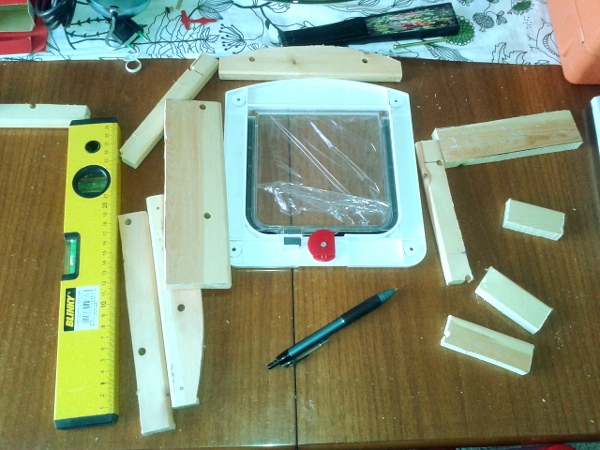
pieces of wood (we used a piece from our Ikea Gorm we had left)
pen (to mark the pieces to cut)
hacksaw
drill with points for wood (we didn’t have one, so we used Ikea’s electric screwdriver with points for wall… hey, it’s DIY at its best!!!)
hot glue&gun (can I toot my own horn for this? Woot woot!!!)
cutter (to finally cut the net)
and of course the cat door with its screws
Phase 1: cutting wood
Mark the pieces you’ll have to cut out in order to build the wooden frame, cut it with the hacksaw (thank you Sa for doing all the manual labour)
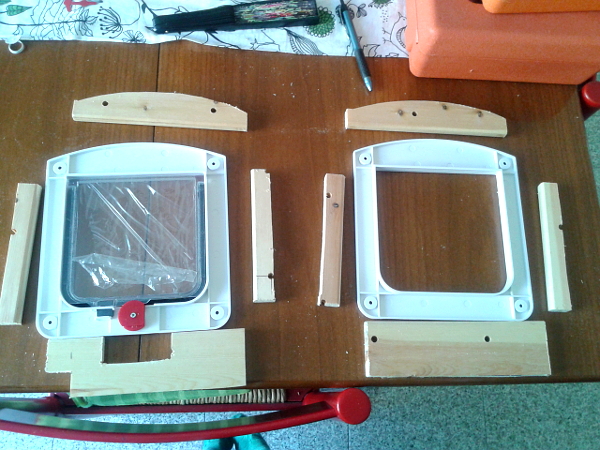
Keep in mind you might have to cut around to make space for any closing system your mosquito net might have (we had to use a thicker piece of wood to have room both for the screw and the closing thingie)
Mark where the holes for the screws are and make them 😛
Shape the wood to make room for the closing system of the cat door (if it has one).
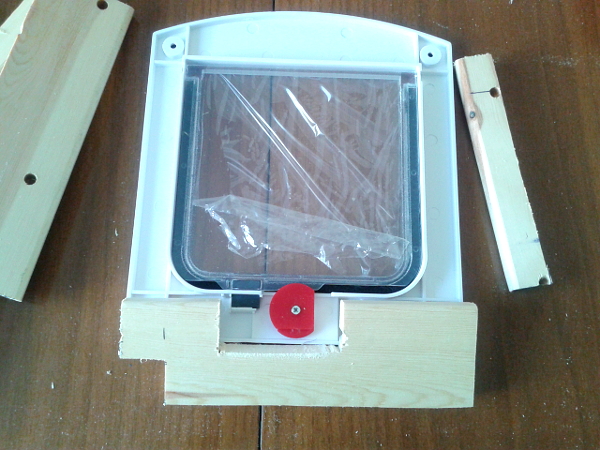
Phase 2: the glue
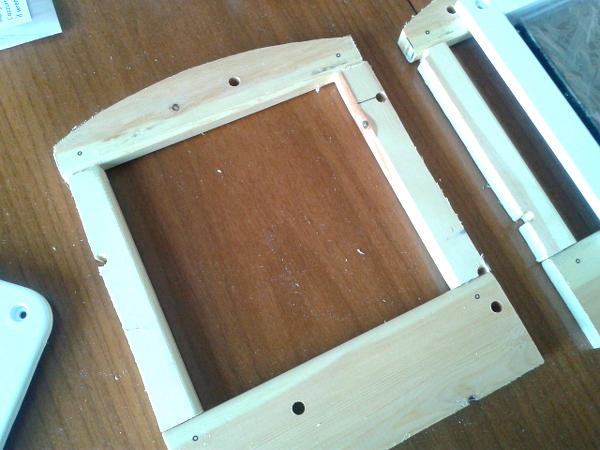
When everything’s ready take the glue gun and glue the wooden parts.
To be precise with it we put all the wooden bits on the cat door, glued, and then removed our brand-new-frame, to be sure it fit perfectly.
Phase 3
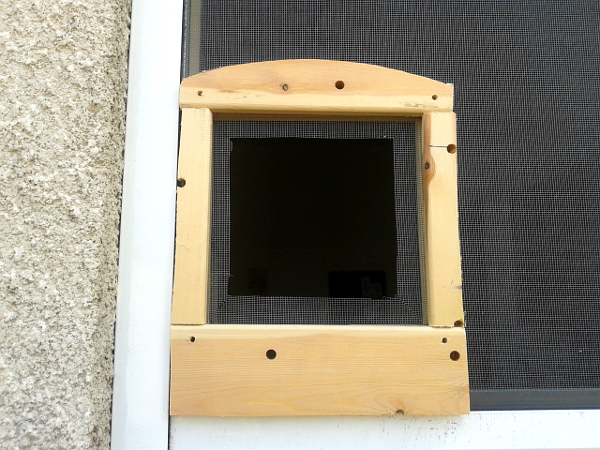
Glue the two frames on either side of the mosquito net (if you need, you can mark the inside/outside part of your frames)
Phase 4
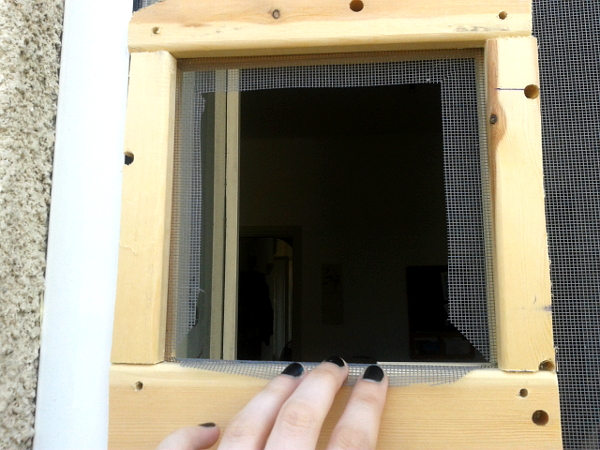
Cutting on a diagonal, cut a square of net away, keeping enough border.
Bend the leftover border and glue it down on the wood, this way (at least in theory) the net won’t fray, it’s like hemming it.
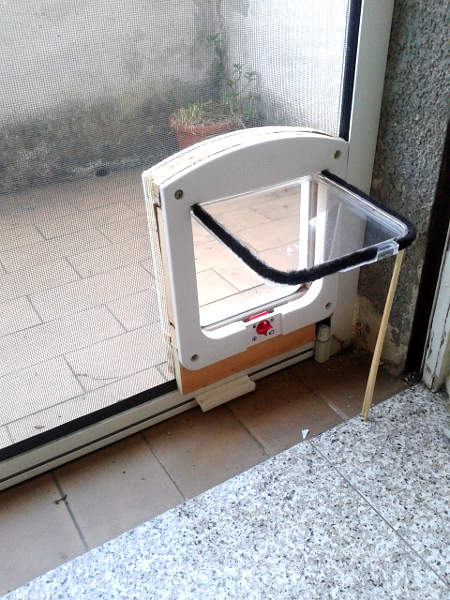
Phase 5
Screw in the cat door.
Voilà, it’s done!
I do realize that this explanation makes it sound fast and easy… it took us an entire morning… and all I did was swiping sawdust, keeping the cat away and holding things in place when needed.
Thank you Sa for doing all the dirt work!!!
Phase 6
Be incredibly patient and explain to your cat how easy it is to use its new door, so that maybe one day it will stop ruining your mosquito net to go out… sigh…
PS
As already stated here, in “only” three days (during which we used the stick method pictured above) Clo learned that it’s much easier to use that new opening instead of destroying everything!
Brav/a, ottima manualita’ e senso pratico.
Grazie, la manualità però qui ce l’ha messa soprattutto Sa 😛
ma la zanzariera così non sarà più avvolgibile interamente, ovviamente. Ovvero si ferma quando incontra la gattaiola vero ?
Sì, la zanzariera smette di riavvolgersi quando la gattaiola arriva al bordo superiore, per noi non è un problema perché la finestra è veramente altissima…
Odio le zanzare e non sapevo come fare! Stamattina mi ero messa a cercare qualcosa su internet e ho trovato voi. Dovreste brevettare questo bellissimo sistema. Vedremo se riusciamo a realizzarlo (spero nel marito fisico sperimentale). Grazie mille! P.S. Il nostro Archimede purtroppo apprezza anche l’erba cipollina, che quindi è stata spostata molto in alto… -_-
Facciamo il tifo per il marito fisico sperimentale!!!
Se ci riuscite voglio vedere il risultato ^_^
Questo e veramente ideale…il nostro Zum ci ha distrutto la zanzariera …ma per il prossimo estate ci metto tutta per costruire questa..grazie per la vostra condivisione Imola
Bellissima idea! Io però ho due problemi un marito negato per il bricolage, ma soprattutto dalla porta entriamo e usciamo molto di frequente e per questo avevamo preso una zanzariera avvolgibile di lato. Ovviamente è andata distrutta!!
Ciao!
Sai che la zanzariera riavvolgibile di lato vuole essere il nostro prossimo progetto?
L’idea di base è di creare una sorta di pannello fisso al quale si attaccherà la parte apribile della zanzariera riavvolgibile.
In pratica: da un lato hai il “rullo” in cui si riavvolge la zanzariera, dall’altro invece di avere lo “stipite” della finestra hai ancora un pannello fisso di zanzariera intelaiata, sotto la quale applicare la gattaiola.
Per ora è tutta teoria, se lo facciamo e riesce bene posto il risultato!
Io ho una porta che si apre di lato. Sono pratico di lavoretti in casa, secondo me si può replicare tranquillamente l’idea aggiungendo un paio di fermi in basso e in alto. Con metà porta aperta si passa. Per l’inverno si smonta, si sigilla con scotch americano e si riavvolge tutto.
Ci provo! Grazie e ciao
Assolutamente!
Poi fammi sapere se è venuto bene
Allora, è venuta benissimo. Ovviamente adesso i gatti vanno istruiti ad usarla.
Le foto le potete vedere sulla mia pagina Facebook
https://www.facebook.com/sergio.manera.14
Una cosa importante: la sicurezza x gatti nell’ultima foto. I gatti non sono proprio delicati nel passaggio e la zanzariera potrebbe aprirsi in modo indesiderato procurandogli magari qualche guaio o spavento. Una stringa e due gancini per legarla e voilà, tutti al sicuro 😉
Ciao e grazie per l’idea
Sergio
Ottimo lavoro Sergio!!!
E anche ottimo consiglio, la mia zanzariera è di quelle che per sganciarle devi essere forzuto e fortunato, non c’è pericolo si apra per caso col passaggio del gatto, ma hai fatto bene a specificarlo per chi ha zanzariere migliori della mia XD
a furia di pensare come fare con la mia zanzariera gigante che non volevo rovinare ho pensato di aggiungere una striscia di tulle in mezzo alle due chiusure della mia zanzariera a soffietto. Ho incollato una calamita a nastro sui bordi del tulle e questi si adattavano perfettamente alla calamita della chiusura della zanzariera.
Visto che la molla della chiusura della zanzariera era più potente della calamita ho aggiunto un listello di legno con due chiodini in alto e in basso come spero si veda dalla foto.
Ho lasciato i 20 cm in basso del tulle senza calamita per fare lo sportellino.
Il bello è che quando i gattini tirano il tulle, questo non si strappa perché la calamita si stacca un po’ ma poi va a posto da sola!!!
come faccio ad allegare le foto?